
Your Eye Has to Travel
How to create a planting plan to delight as you walk through your yard
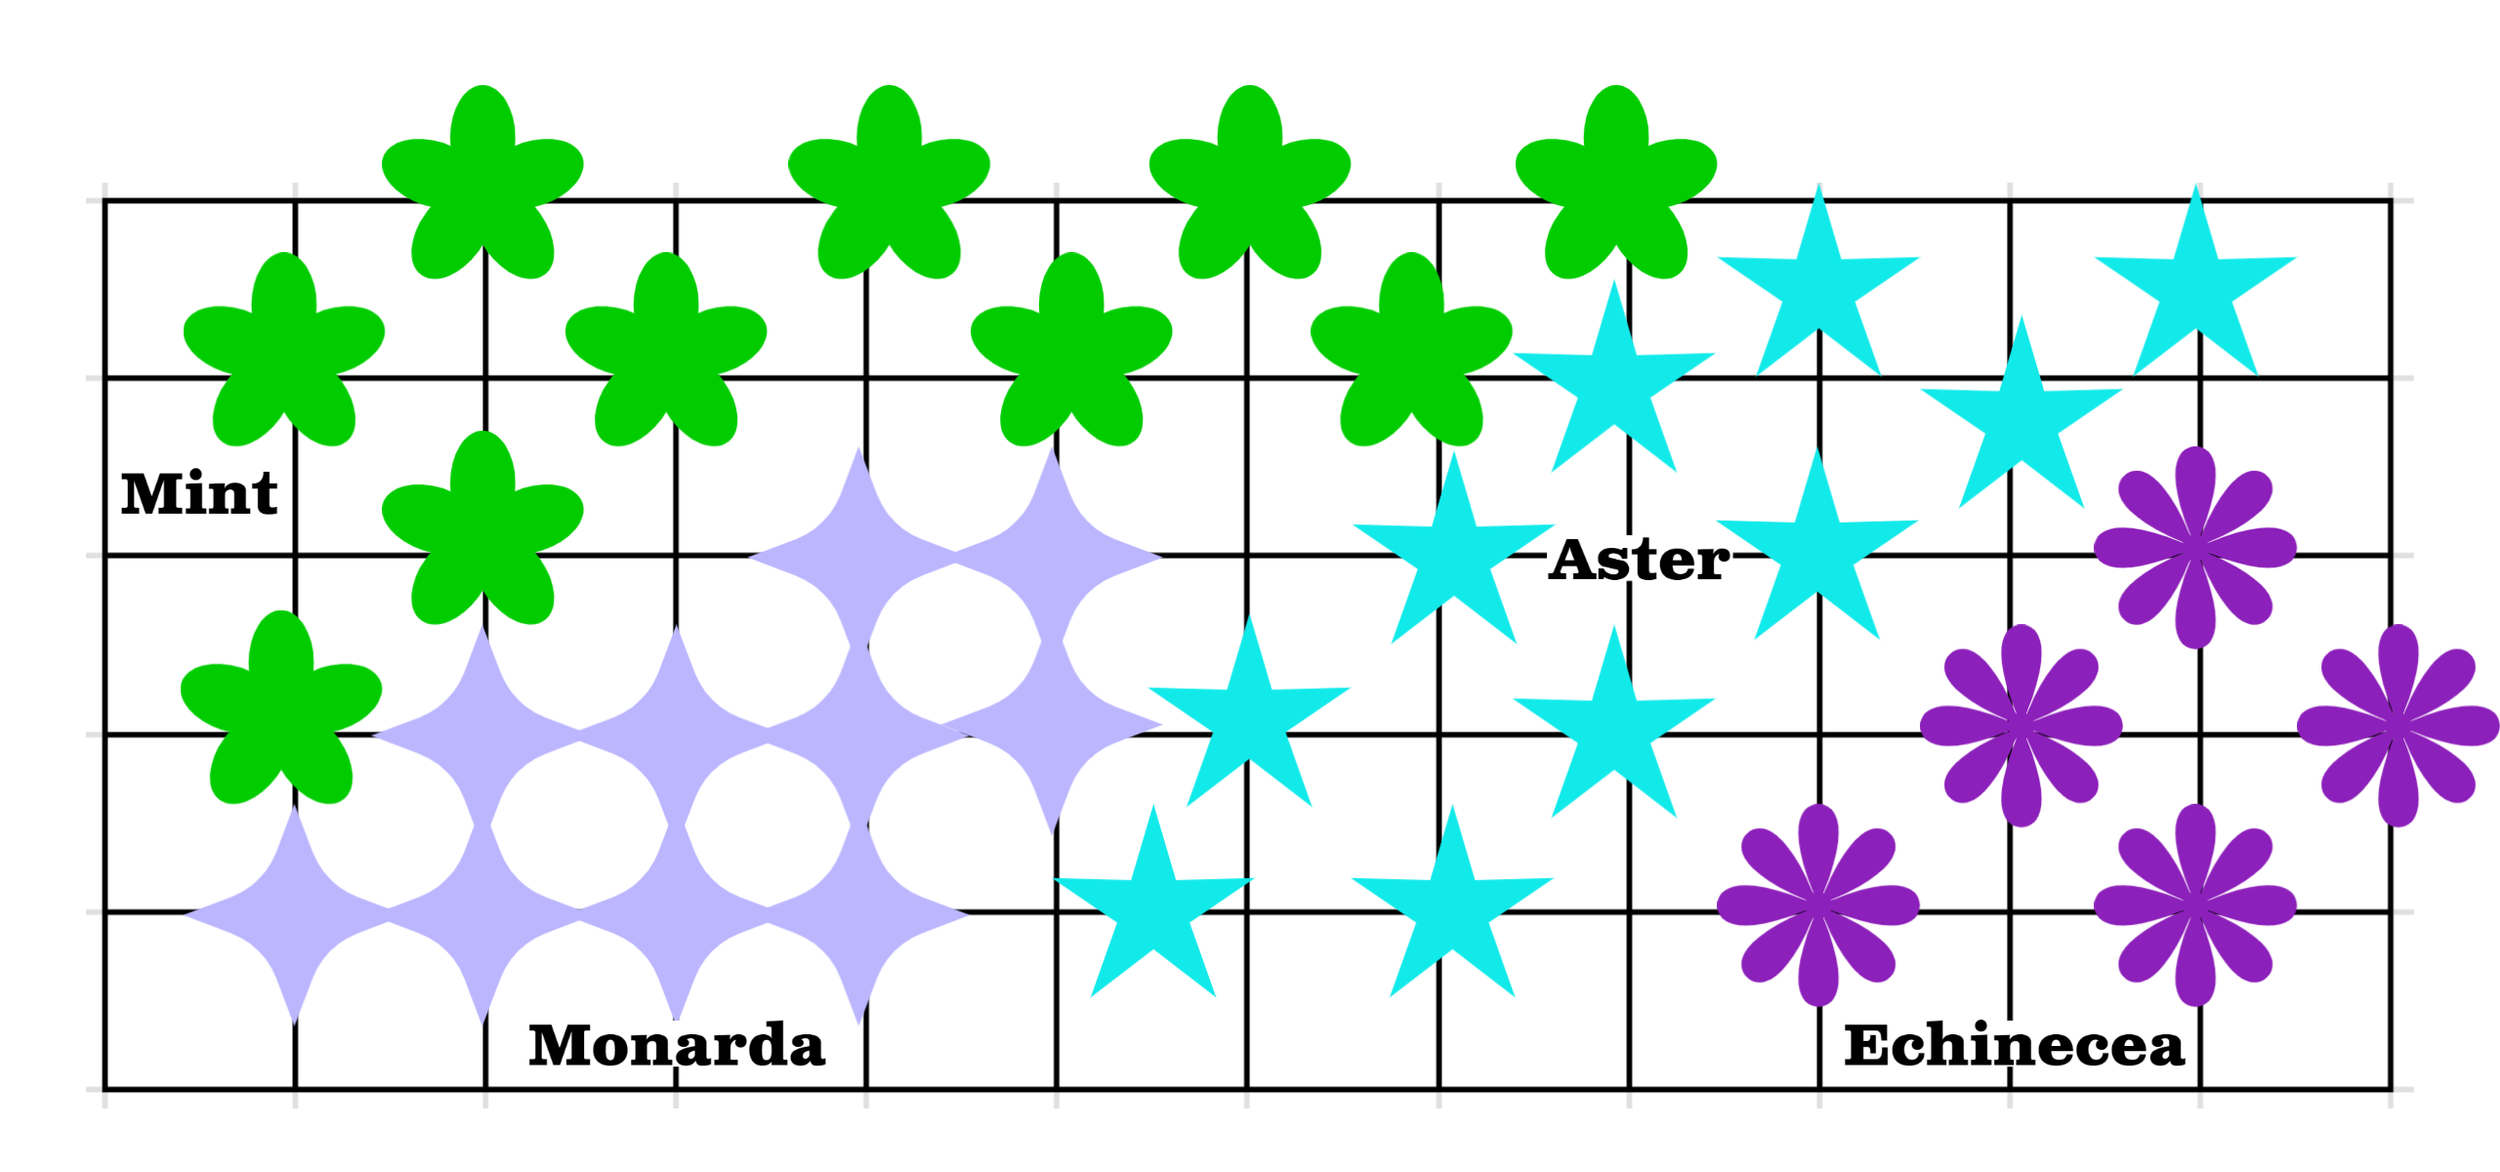
Planting plan for Zoe’s sunny tick border
Dear Avant Gardener, More than 20 friends will be here next weekend for my planting party. I thought I’d put the plants in place for them to install. How do I do that? We talked about the plant layout in early March when we ordered the plants. But then you finally convinced me to do a real plan and it’s different from what we ordered for. Help! — Your daughter Zoe, Dutchess County, NY
Bingo! It’s math time! I love this! When I told Pete about your question, he said, “You may be the only person in the world who gets excited about it, but it’s got to be done.”
As I’m sure I’ve told you (a million times?), I got the math and science prizes at high school graduation. I’m a math nerd. But I find myself tripping over the simple arithmetic and geometry needed for planting plans. You’ve done some carpentry, which uses the same skills, so perhaps it’ll be easier for you. And the good news is that live plants are much more forgiving than wood, so a rough plan is sufficient and you can adjust on the ground — literally. To spare readers the equations, I’m going to focus this answer on the design principles and put the math in “How” below.
Rhythm and repetition
The guiding principles for your planting plans will be repetition, differentiation, and massing and intermingling. As articulated by Rosemary Alexander in her go-to guide for English garden professionals,
Rhythm and repetition dictate the pace at which a scheme is viewed and can bring coherence to a series of disconnected ideas and styles. When planning the outline form of your planting, be sure to repeat effects across the garden to relate one area to another. Repeating plants helps to restrict the plant palette and usually results in strong, bold effects as opposed to the “dot” approach — one of this here, one of that there — which always looks restless. However, too much repetition can tip the scheme in the other direction and risks becoming boring. — The Essential Garden Design Workbook #paid link
Because you’re planting the property in phases, I’m going to focus on repetition within beds, which establishes rhythm. Your tight palette guarantees color repetition throughout the yard. Once you know which plants do best and please you most, you can repeat them elsewhere. You may be able to achieve this repetition by moving “volunteers” from plants that reseeded or spread by stolons (above ground) or rhizomes (below ground).
Differentiation: The garden curtsies to the house
Balancing repetition, differentiation creates varied experiences that pull you through the garden and deliver surprises as you turn a corner or enter a new area. You’ve already built differentiation into your plant orders, creating various environments loosely based on plant communities local to your area — a woodland garden along the front of the house, a woodland edge of shrubs facing it across the path as a privacy hedge, and tick border of tall, aggressive mint-family plants around the large, circular lawn.
Another aspect of differentiation I’d like to see on your property is the classical ideal “the garden should curtsy to the house.” According to Renny Reynolds, this means
Gardens immediately surrounding the house mirror its architecture to some extent, being more symmetrically “room”-like, with hedging and hardscape and terracing, and then become less formal, moving into a more parkland or meadow or wooded idea as one moves away from the house. — Chasing Eden
You can apply this rule very loosely — or not at all. For example, you decided after you placed the plant order to divide the lawn into two areas: a patio nearer the house and a large, circular lawn beyond it, consistent with the “curtsy” concept. Instead of running the tick border along the north side of both, why not emphasize the two rooms with different planting experiences? The shrublike blue false indigo plants, originally part of the tick border, can be planted as a hedge — a more formal feel — along the sunny north and east sides of the patio. The remaining mint-family plants can be planted in big groups in a repeating pattern around the circle.
In front of the house, you plan an edge of low-growing woodland sedum along both sides of the path — another formal element near the house. And the petite woodland plants along the front of the house, while truly woodland plant communities, have a controlled look. On the other hand, the woodland edge-like mixed hedge across the path from the house is more wild. As Staub points out,
On a typical suburban lot, the idea of screening and enclosure for a snug feeling of privacy must necessarily be a primary concern. — Chasing Eden
Organized groundcovers can add another formal element to the hedge. For example, from your plant order, you could put a blanket of Jacob’s ladder on one side of the hedge and a row of delicate maidenhair ferns on the other.
Balancing massing and intermingling
In nature, you’ll see big masses of one plant and you can also count numerous species within a small area — often both at once. That’s because plants exist in layers. In addition, they change over the season, with the plants that happen to be flowering drawing all the attention at that moment.
I love big masses of one plant — think bluebells in the understory in spring. But those ephemeral bluebells will die back and become invisible after they flower. So you need to plant something else among them to provide interest for the rest of the season. Other plants — like the Jacob’s ladder I suggest planting in mass in front of the hedge — have foliage that’s interesting enough to hold attention even after their spring flowering.
To balance massing and intermingling, I often plant perennials in groups of three to 10, fewer in a smaller bed in order to provide for the rhythm I mentioned earlier. Your two main main flowering beds — woodland and tick border — are each more than 60 feet long, so groups of five to 10 feel right. The woodland plants can be in slightly smaller groups and more intermingled than the tick border ones, which are more aggressive and tend to mass anyway.
Patterns create rhythm
With long beds like yours, you can create repetition by dividing the bed into segments and then repeating them along the length. For your 60-foot woodland garden, you ordered six of the black cohosh, which will eventually have a three-foot spread, much bigger than the other plants. If you create a 10-foot pattern with the cohosh and the other four plants, you’ll repeat that pattern six times along the length of your house. See more details and examples below.
Happy planting!
— The Avant Gardener
Why, How, Wow!
Why?
Why bother? The ecological value of Zoe’s plants would probably be the same if she installed them willy-nilly as quickly as possible. But that would not be natural looking, because biological processes create patterns that are a kind of design. And, those arrangements do impact ecological function, as Dan Potter found in his research on the optimal design of monarch gardens.
To a certain extent, Zoe’s planting plans attempt to imitate nature, especially in the woodland garden and privacy hedge. But what about the tick border and the hedge of blue false indigo I recommend around the patio? We find nature beautiful, so why try to improve on it?
Right now, garden fashion favors naturalistic design. Although their proponents are often philosophically aligned, naturalistic design is really separate from ecological landscaping. The leading figures in naturalistic design often incorporate non-native plants into their meadows and, at least originally, were not focused on nurturing specialized native insects.
I love the naturalistic look, but I also like lots of other styles — styles that can easily be produced using native plants and ecological practices. My first all native-plant garden was French style, with parterres defined by native inkberry instead of exotic box. My friend Jonathan is designing a Japanese dry garden incorporating Santa Fe natives like dwarf pinon pine. Gardens can have enormous ecological value without being naturalistic in design.
So why vary the garden styles around Zoe’s house? As legendary fashion editor Diana Vreeland said, “The eye has to travel.”

Repeated clumps of Astilbe ‘Purpurlanze’ (not U.S. native) pull the eye into this naturalistic garden carefully planned by Tony Spencer, known as the New Perennialist (Source: New Naturalism).
How
Now let’s get into the weeds (haha). Here’s the math for typical perennial beds from a planting plan and plant spreadsheet with (at minimum) plant name, height, spread, and flowering period. If you have multiple beds, add a column indicating the bed for each plant and filter for one bed. (See sample planting spreadsheet.)
Determine the width and depth of the planting bed, making simplifying assumptions.
If it’s deeper at one end than the other, use the average depth. (Hopefully, you did a rough version of this to order your plants.)
For beds around circular lawns like Zoe’s, calculate the width using the formula for the circumference of a circle (2πr, where π = 3.14). The back of the bed will be wider than the front. Zoe’s tick border is only six feet deep, so we just used the front measurement for the plan segment. She will space the back plants little further apart when she lays them out.
If the bed is more than 20 feet wide, divide the length into segments of 10 or 12 feet.
Divide the number of plants of each species by the number of segments. For segments six to 12 feet deep, this number will probably be between three and 10.
Look at the spread column. Most native perennials have a spread of one or two feet. Note any outliers and adjust your plan accordingly.
Sort the plants from tall to short. You’ll find that estimates vary widely, as do actual plants. I use the average of the range from the source I find most reliable. Don’t sweat it.
Arrange the plants on a 1 foot by 1 foot grid, putting taller plants in the back and mixing up colors and flowering periods. You can use paper or a favorite drawing app (PowerPoint, Canva, Adobe Express, etc.).
If you have only one or two segments: Divide each species into two or three clumps and spread these clumps over the length of the bed
If you have multiple segments — which means a larger garden overall — then make each species one clump or, more poetically, “drift”

Planting plan for Zoe’s shady woodland garden
Planning a mixed hedge with groundcovers
Refer to my article Creating a Privacy Hedge: Part II for how to position the shrubs, the first step in planning a mixed privacy hedge. In place of thick mulch, I recommend planting perennial groundcovers. You can plant the groundcovers according to a plan, simply mix three groundcovers randomly, or create more formal effects with massing, as in the plan below for Zoe’s hedge.
This is an example of a hand-drawn plan with both shrubs and perennials. Note that the size of the grid (graph paper squares) is smaller to encompass a larger area. To place specific species in specific places (e.g., evergreen mountain laurels in front of the windows), we created a detailed shrub plan for the entire length, not cutting it into segments. Sometimes, segments would do. See resources for helpful tools.

Planting plan for Zoe’s privacy hedge
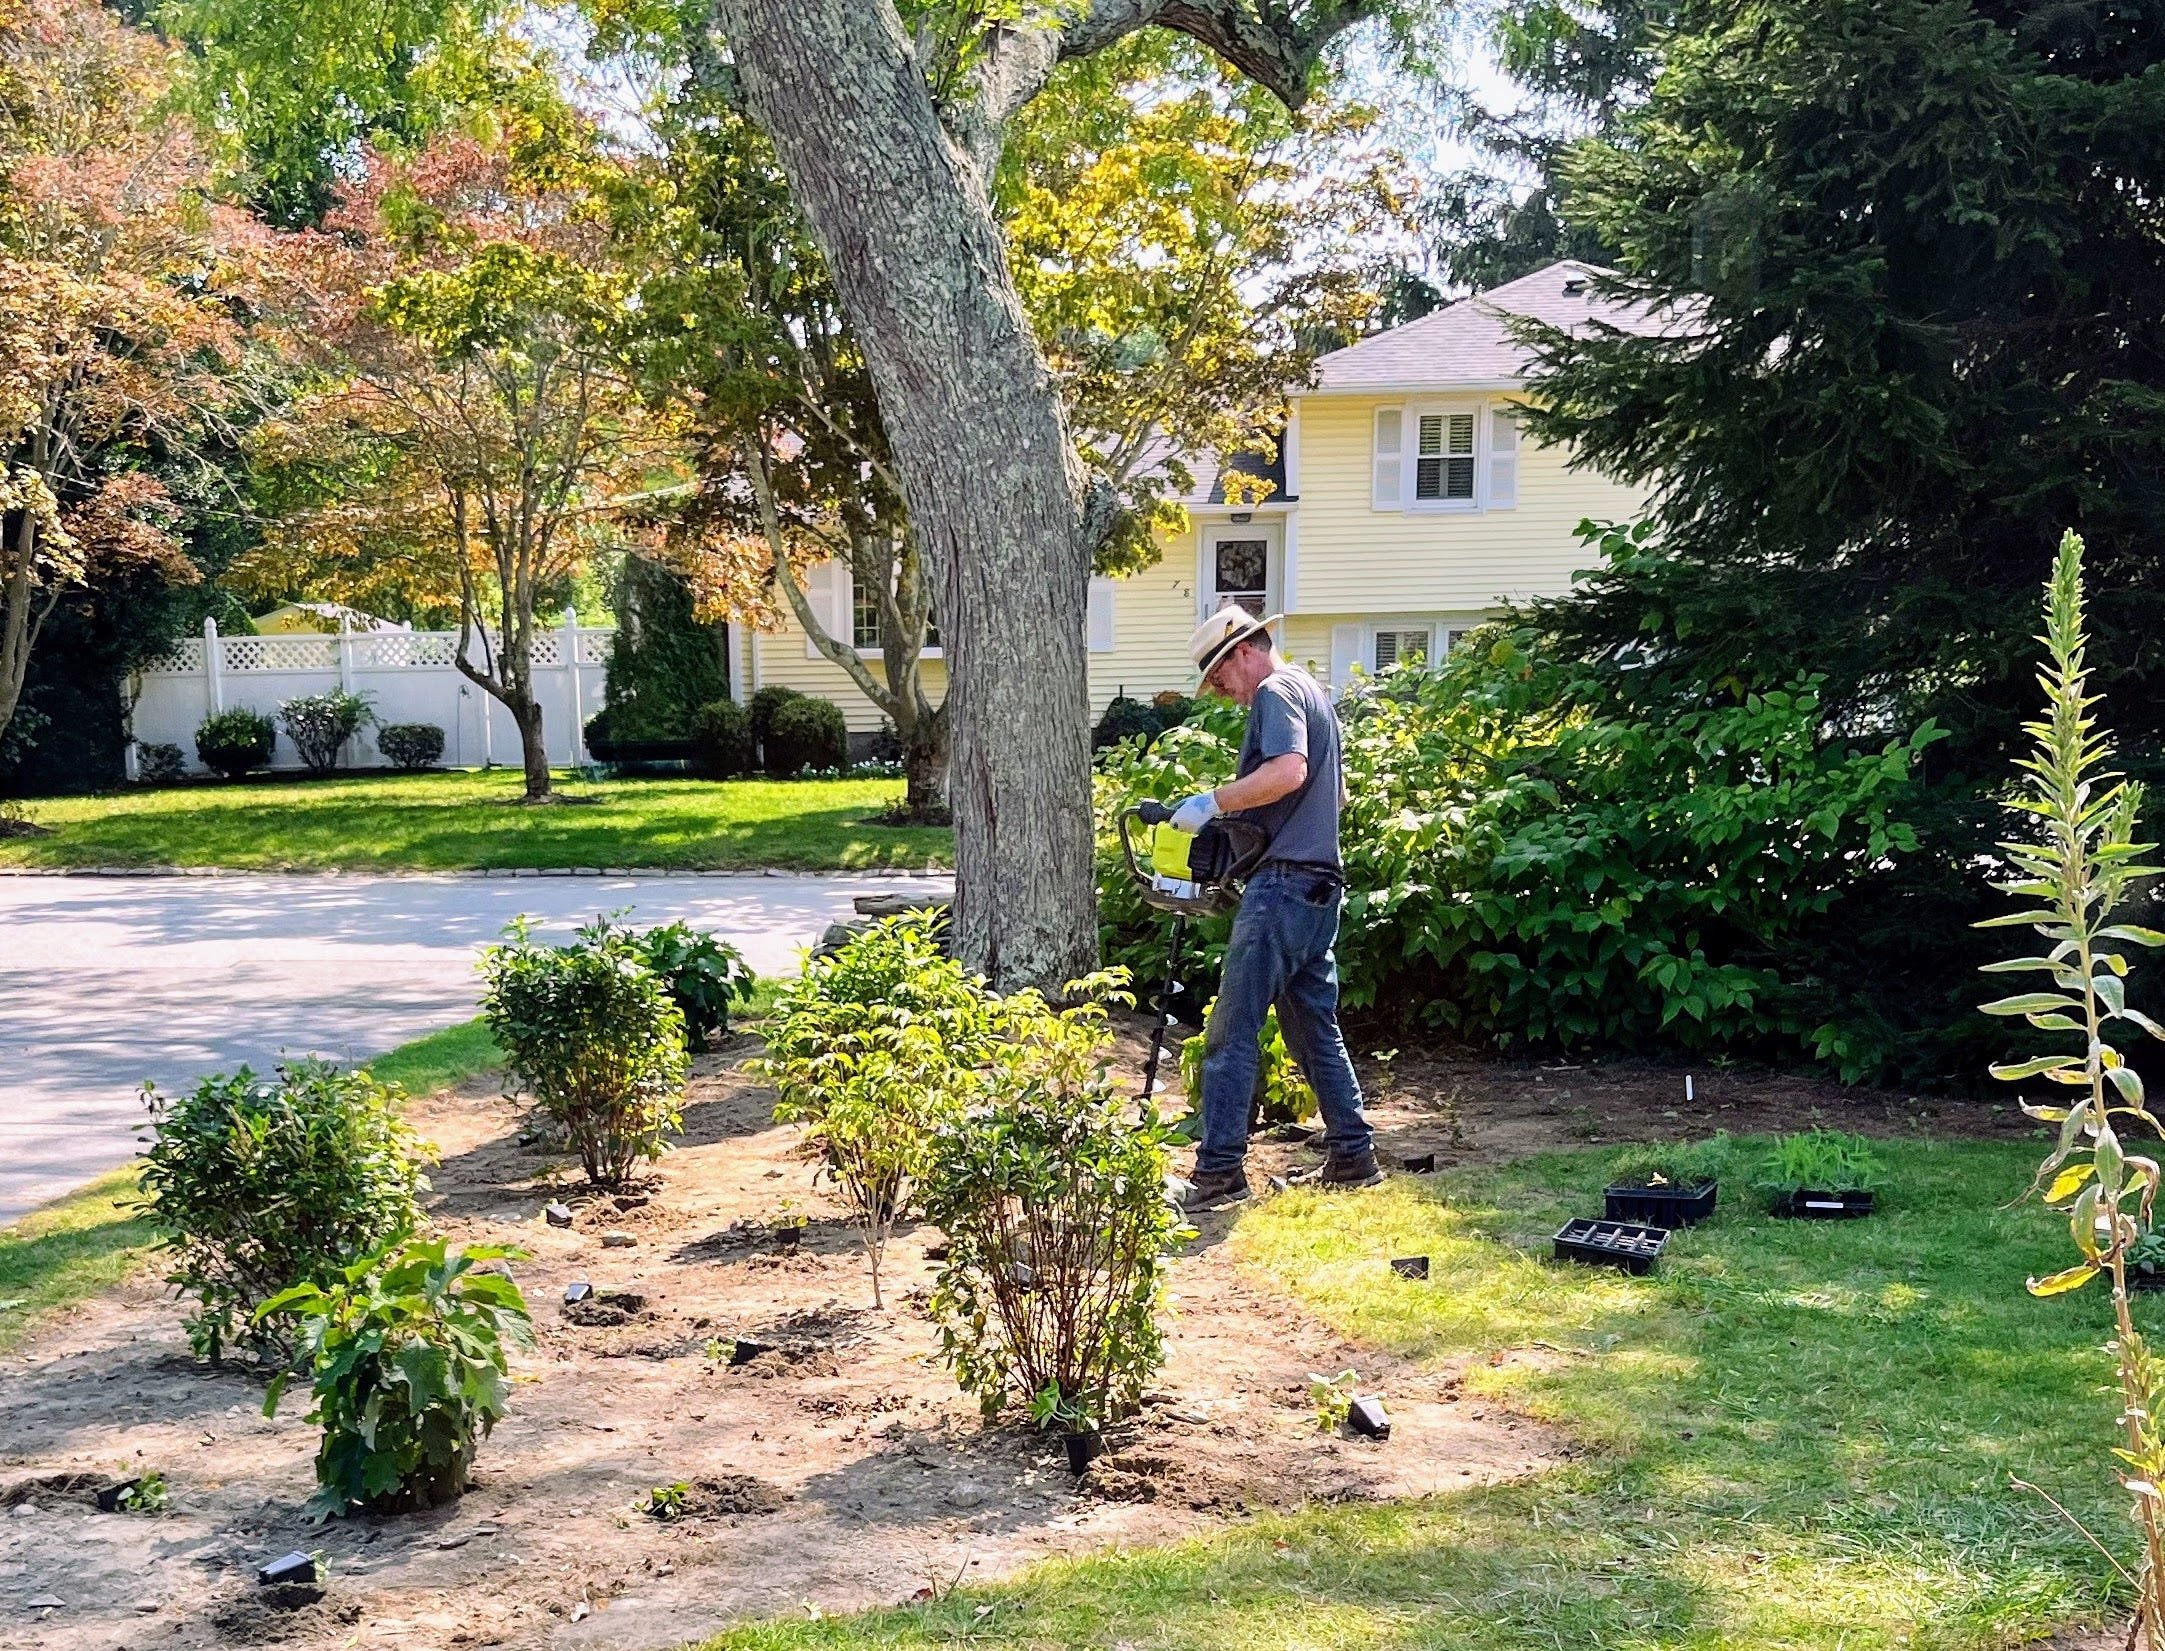
Pete installing shrubs for one of our privacy hedges, with flats of groundcover plugs behind him. He made a lot of spontaneous changes to my plan in order to fit the shrubs among the tree roots.
Wow!
The process we used for Zoe’s yard, summarized above, is fairly traditional. “Naturalistic” gardens often have more detailed plans with many more species, more intricately arranged.

Isn’t this “naturalistic” planting plan by Piet Oudolf a work of art? (Source: Planting the Natural Garden)
Related Resources
Want to make an overall plan for your yard? Read about how we approached Zoe’s in Do You Use Your Yard?
Ready to order plants? Read about estimate the numbers of plants needed for Zoe’s yard in 5 Steps to Order Your Plants.
Interested in monarchs? Read The Best Monarch Garden Design Isn’t What You Think.
Looking for drawing supplies? Here’s everything I used to create Zoe’s privacy hedge plan: landscape design stencils, 11- by 17-inch graph paper, and this 0.7mm mechanical pencil and eraser set. #paidlinks

Disclosure: As an Amazon Associate I earn from qualifying purchases.